If you’ve ever ended a Zoom meeting and wondered, “Where do Zoom recordings go?” — you’re not alone. This is one of the most common questions among new Zoom users and even seasoned professionals. When you hit that record button, Zoom saves your meeting in one of two places: locally on your device or in the cloud (if you have a paid plan). But here’s where many people get confused — the storage location depends on your recording settings before the meeting starts.
When you record locally, your file is saved directly to your computer, usually inside a folder named “Zoom” within your Documents directory. On the other hand, if you’re using cloud recording (available for Pro, Business, or Enterprise users), your recording is securely stored online in your Zoom account. From there, you can view, download, or share it easily. Understanding where your recordings go not only helps with organization but also ensures your important content is never lost.
Where Do Zoom Recordings Go on Your Computer?
When you choose to record locally, Zoom saves your meeting files to your computer after the session ends and the video is processed. Typically, you’ll find the recordings in your “Documents” folder under a subfolder named “Zoom.” Inside, each meeting gets its own folder labeled with the meeting’s date, time, and title. This makes it easy to locate a specific recording even if you’ve hosted several meetings.
You can also customize where Zoom saves your local recordings. By going into Zoom’s settings and selecting the “Recording” tab, you can choose a specific folder or drive location. This feature is especially helpful if you prefer storing large video files on an external hard drive or cloud service like Google Drive or Dropbox. Just keep in mind that local recordings take up space on your computer, so make sure you have enough storage before recording long sessions.
Where Do Zoom Recordings Go in the Cloud?
For users with a paid Zoom plan, cloud recording offers a seamless experience. When you record a meeting to the cloud, Zoom automatically uploads the video, audio, and chat files to your Zoom account after the meeting ends. This eliminates the need to manually transfer files and gives you the flexibility to access them from any device with an internet connection.
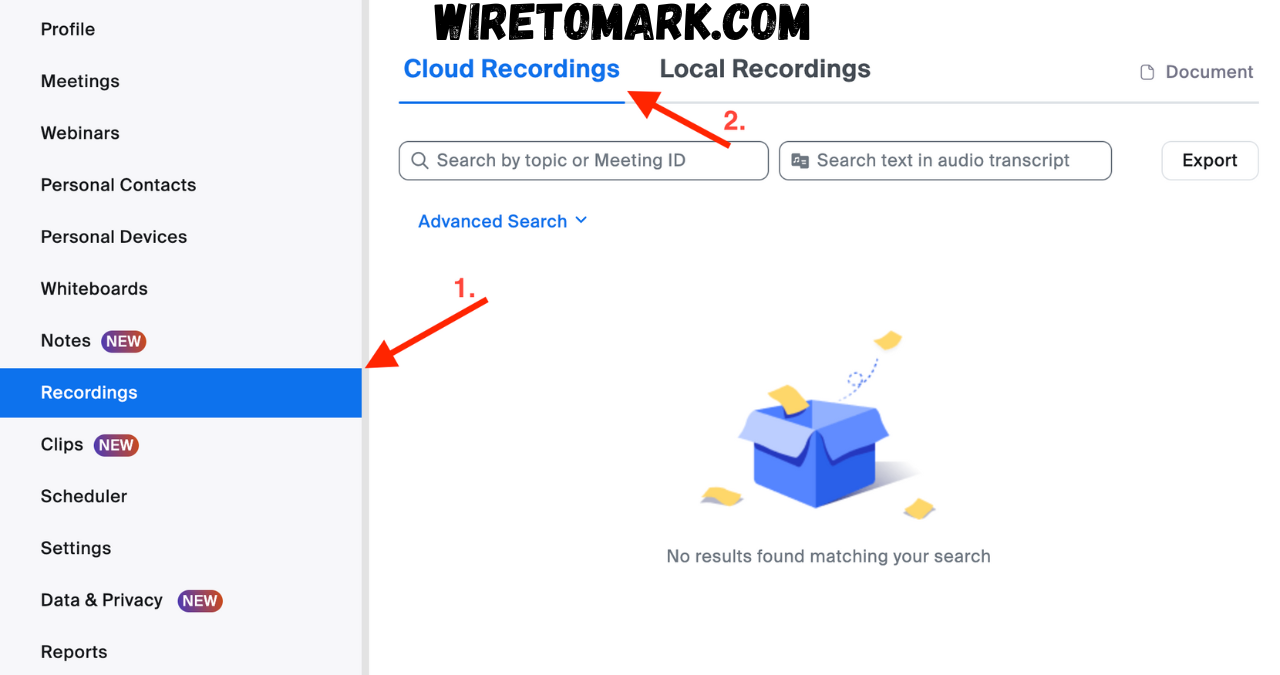
You can find your cloud recordings by logging into your Zoom web portal and navigating to the “Recordings” section. From there, you’ll see all your saved meetings, with options to play, download, or share via a secure link. One of the biggest perks of cloud recordings is that they don’t rely on your computer’s storage space, making them ideal for frequent hosts or educators who record multiple sessions a week. Plus, Zoom automatically backs up these files, reducing the risk of accidental loss.
How to Access Your Zoom Recordings Easily
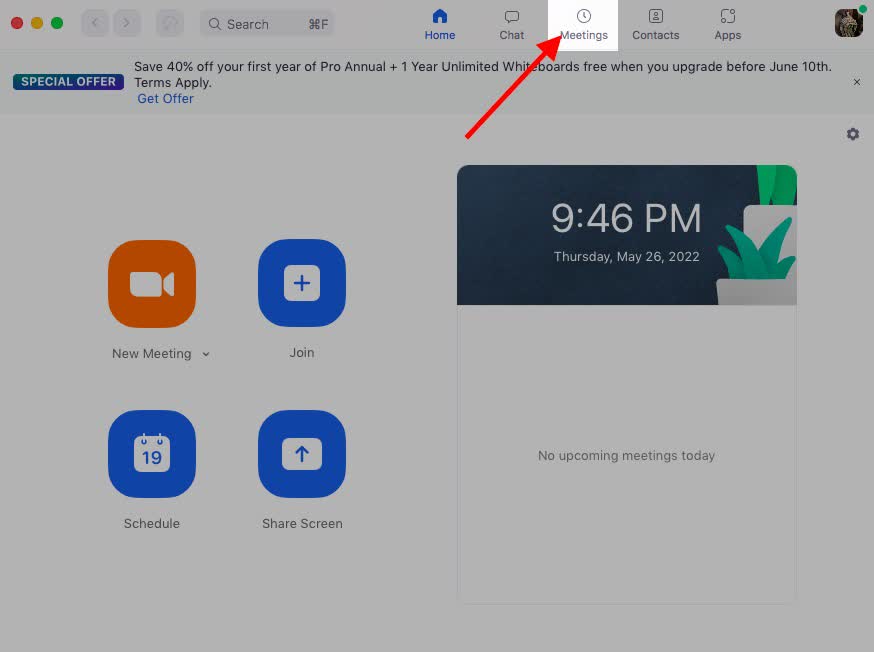
Accessing your recordings is simple once you know where to look. For local recordings, you can either open the Zoom desktop app and go to the “Recorded” tab, or manually browse your file explorer. Within the folder, you’ll find several file types — the MP4 video file, the M4A audio file, and sometimes a text file for chat messages. The MP4 file is the main one you’ll use if you plan to upload your recording to YouTube or another platform.
If you recorded to the cloud, your recordings are stored online in your Zoom account. Log in, navigate to “Recordings,” and select the cloud tab. You’ll see a list of your saved meetings with options to play or download. You can also share recordings by copying the link and sending it to participants. The convenience of cloud access makes it perfect for teams and remote workers who need to share content quickly without worrying about file transfers.
Understanding the Difference Between Local and Cloud Recordings
The main difference between local and cloud recordings lies in storage location and accessibility. Local recordings are saved directly to your device, which means you have full control over the files. They don’t require an internet connection to access, making them ideal for private or offline use. However, they consume your device’s storage space and are not automatically backed up.
Cloud recordings, on the other hand, are stored on Zoom’s secure servers. They offer more convenience, as you can access and share them anytime from your Zoom account. Cloud recordings are especially useful for organizations, educators, and businesses that need centralized access and data security. The downside? Cloud storage is limited based on your plan, and once you hit the limit, you’ll need to delete old files or upgrade your plan.
How to Change the Default Location of Zoom Recordings
Did you know you can change where Zoom saves your recordings? By default, Zoom saves local recordings to your Documents folder, but you can modify this easily. Open the Zoom desktop app, click on “Settings,” then “Recording,” and select a new folder location. Many users choose to save recordings on an external drive or cloud-sync folder for easier backup and sharing.
Changing your recording location also helps manage disk space. If you regularly record long meetings or webinars, your storage can fill up quickly. Setting your recording folder to a larger drive or cloud storage service can save you from running out of space at a critical moment. It’s a simple tweak that can make your recording workflow smoother and more reliable.
How to Locate Missing Zoom Recordings
Sometimes you finish a meeting and can’t find your recording — don’t panic. If you recorded locally, open the Zoom app and go to the “Recorded” tab. You’ll see a list of your past meetings, and from there, you can open the file location. If the file is missing, check your Recycle Bin or Trash folder; sometimes recordings can be accidentally deleted or moved.
For cloud recordings, if your recording isn’t showing up immediately, it might still be processing. Depending on the meeting’s length, Zoom can take some time to process and upload the recording to the cloud. You’ll receive an email notification once it’s ready. If it’s still missing after several hours, double-check that you used the correct account, especially if you manage multiple Zoom logins.
Tips for Organizing and Backing Up Zoom Recordings
Once you understand where your Zoom recordings go, organization becomes key. Creating a dedicated system for naming and sorting files can save you hours of frustration later. For example, you can name folders by project, client, or date. This helps you locate the right recording instantly when you need it.
Backing up your recordings is equally important. While Zoom’s cloud offers some protection, it’s always smart to create an additional backup on an external hard drive or another cloud platform. This ensures your valuable meeting data is safe in case of accidental deletion or technical issues. Taking a few minutes to organize and back up can save you a lot of stress in the long run.
Managing Storage Space for Zoom Recordings
If you record often, you’ll notice that Zoom recordings can take up quite a bit of space. Video files, especially in HD, are large and can quickly fill your local or cloud storage. For local recordings, consider regularly transferring older files to an external drive. This keeps your computer running smoothly while preserving your content.
For cloud recordings, keep an eye on your storage usage in the Zoom web portal. Zoom allows you to delete older recordings to free up space or download them before deleting. Many users schedule a monthly review of their cloud recordings to clean up unnecessary files. Efficient storage management ensures you always have space for your next important meeting
How Long Zoom Stores Your Cloud Recordings
Zoom doesn’t automatically delete cloud recordings unless you reach your storage limit or manually set a retention policy. However, it’s wise to manage your files regularly, especially if you’re using a business account with multiple team members. Some organizations set up automatic deletion after a specific number of days to prevent overcrowded storage.
You can customize your storage settings under your Zoom account’s admin panel. If you need to keep recordings long-term, download and store them on your computer or another backup service. By actively managing your recordings, you’ll avoid surprises like running out of space right before an important event.
Privacy and Security of Zoom Recordings
Zoom takes the privacy and security of recordings seriously. Cloud recordings are encrypted and stored securely, with access limited to authorized users. You can also password-protect shared links, ensuring that only invited participants can view your meeting. This is particularly valuable for businesses that handle confidential information.
For local recordings, security is up to you. Make sure your device is protected with strong passwords and reliable antivirus software. If you share recordings with others, use secure file-sharing platforms instead of email attachments. Practicing good security habits keeps your data safe and your meetings confidential.
How to Share Zoom Recordings Professionally
Sharing Zoom recordings can be as simple or sophisticated as you like. For local recordings, you can upload the video file to a sharing platform like Google Drive or Dropbox and send the link. For cloud recordings, Zoom provides a built-in sharing feature. Just copy the link from your Zoom portal and send it to your audience.
When sharing professionally, add context to your recordings — such as timestamps or a short summary. This helps recipients quickly find key moments in long meetings. You can also enable “View only” permissions to ensure viewers can watch without downloading or editing the file.
Editing and Trimming Zoom Recordings
Sometimes you don’t need to keep the entire recording. Zoom allows you to trim cloud recordings directly from your account. This feature is perfect for cutting out awkward silences, setup time, or unrelated discussions before sharing your video. Simply click on your recording in the web portal, then use the trim tool to select the portion you want to keep.
For local recordings, you can use any video editing software — even free tools like VLC or iMovie. A quick trim can make your video look more professional and keep your audience focused on the important content. Editing your recordings ensures they’re clean, polished, and ready for presentation or sharing.
Common Issues and Fixes for Zoom Recordings
Occasionally, users run into issues where recordings fail to save or playback errors occur. If your recording doesn’t appear, check your device’s storage space — low disk space is a common culprit. For cloud recordings, ensure your internet connection is stable during upload. Sometimes, Zoom just needs a few extra minutes to process and display the file.
If your recording won’t play, try using a different media player or re-downloading the file. Corrupted files are rare but can happen if the recording was interrupted abruptly. Keeping your Zoom app updated can also prevent many common issues, as newer versions often include bug fixes and performance improvements.
Conclusion
Knowing where your Zoom recordings go is more than just a matter of convenience — it’s essential for managing your digital workspace efficiently. Whether your recordings are stored locally or in the cloud, understanding their location, how to access them, and how to keep them organized will make your professional life smoother. With the right setup and a few best practices, you’ll never have to worry about losing an important recording again.
FAQs
Q: How can I check if my meeting was recorded?
A: After your meeting, open Zoom and go to the “Recorded” tab. You’ll see all your recorded sessions listed there. If you don’t see it, check your Zoom web portal for cloud recordings.
Q: Why can’t I find my recording on my computer?
A: It might be saved in a different folder or still processing. Check your Zoom settings to confirm your default recording location or use the search function on your device to find files ending in “.mp4.”
Q: Are Zoom recordings automatically deleted?
A: Local recordings stay on your computer until you delete them manually. Cloud recordings remain in your account until you remove them or reach your storage limit.
Q: Can I share my Zoom recording with others?
A: Yes! You can share cloud recordings directly from your Zoom account or upload local recordings to a sharing service and send the link.
Q: Is it safe to store recordings on Zoom’s cloud?
A: Absolutely. Zoom encrypts your cloud recordings and allows you to add password protection for extra security.